
Recipe at the top, chit-chat at the bottom!
Razzleberry Pie
- 2 pie crusts (homemade or roll & bake; I used a generic store brand)
- 4 cups of frozen mixed berries, THAWED (I used two 16 oz packages Great Value Berry Medley from Walmart)
- 3/4 cup sugar (white/granulated)
- 1/4 cup cornstarch (flour would work also)
- 1/4 teaspoon ground cinnamon
- 1 Tablespoon lemon juice
- 1 egg (for brushing the pie before baking)
- Sprinkling sugar
Preheat oven to 375 degrees.
Place bottom crust (unbaked) in pie pan. (If using a rolled unbaked crust, I first roll on a floured surface so is a little bigger than my pie pan and drapes over the edges.)
In mixing bowl, combine berries (thawed but cool, including juice), sugar, cornstarch, cinnamon, and lemon juice. Gently stir until combined.
Gently pour berry mixture into unbaked crust.
For lattice crust:
Roll the unbaked crust on floured surface.
Cut into wide strips, app. 1 inch wide. (I used a pizza cutter for this.)
Place horizontal strips over the fruit so that strips overlap the bottom crust edges near the edge of the pie pan leaving small gaps. (Use the longest pieces for the middle of the pie and the shorter lengths for the edges.)
Pull back every other strip of dough, just until one side of the pie/fruit is exposed. Lay the middle cross-strip first. Fold back in place the strips you had folded open and now fold back the opposite strips for the next row of lattice.
Continue folding back strips, laying strips, and replacing folded strips until one half of the pie is latticed.
Now work on the other half of the pie.
NOTE - if you run out of strips that are long enough, remember that you can further roll the strips out a little bit to lengthen. Not too thin, but a little bit helps to stretch long enough to reach the crust edges.
After lattice is complete, trim excess or fold & crimp edges of the crust however you like to do pie crust edges. I use either my fingertips or crimp edges with a fork.
Brush unbaked crust with blended egg and sprinkle with sugar.
Place the unbaked pie on a cookie sheet for baking (sometimes the filling bubbles over).
BAKE @ 375 degrees app. one hour or a little longer until crust is consistently browned.
(If edges of the crust get too dark before the middle is done, tear a piece of foil large enough for the entire pie, cut a circle in the middle of the foil and gently lay foil over the pie in the oven (with the cut circle exposing the middle of the pie) to prevent the edges of the crust from browning too much.)
Remove from oven when browned to your liking.
Leftover pie does not have to be refrigerated.
Serve with a fork and some vanilla ice cream (if you have it) for an over-the-top pie eating experience.
This pie also makes a good breakfast. Just saying! 😁
Here are a few pics of the process - making the lattice:

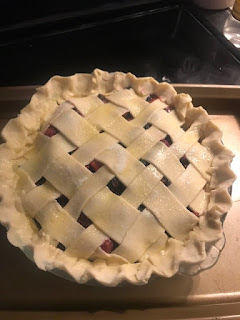
And now ready to bake (egg wash & sugar are on it):
MMMMmmmmmmm!

***
The Chit-Chat:
This year, we opted out at the last minute of attending our large family Christmas dinner due to a few folks being under the weather. Thankfully, we had leftover BBQ and this delicious and gorgeous homemade pie ready, which I had made the day before for contributing to the Christmas dinner feast.
The weather was even off this year as it was very warm and we were able to eat our dinner of leftovers and pie on the porch while enjoying the warm breezes and the sunshine. This seems to be the way we roll these days of constant changes and evolving traditions for our family. Next year, I vow to have a pan of lasagna in the freezer for baking just in case Christmas dinner changes at the last minute again. :) (But remember... I'm always looking for a reason to eat pasta! LOL)
I made this pie using a couple of different recipes and it turned out so wonderful that I wanted to post it here. Definitely this pie will be good for Thanksgiving, Christmas, birthdays, Valentine's Day treats, and 4th of July celebrations. Pretty much this is a year-round pie and since I used frozen fruit from Walmart, you don't even have to depend on fresh berries. It was also fairly inexpensive to make since each bag of the frozen fruit was only $1.98/each and I only used two.
I think this filling would also make a great fruit crisp!
It took little time to put together and I think it would be an exciting dish to share at any potluck. This pie is a true winner in my book!
Enjoy!

Gina
Comments
Post a Comment